Showing posts with label Windows Support.. Show all posts

Monday, November 29, 2010

How To Use System File Checker Tool In Windows XP

Windows XP has the ability to protect itself from system instability caused by 3rd party software overwriting important system files.

In Windows XP we have more refined protection of these important files.

Windows File Protection
By default, Windows File Protection is always enabled and allows Windows digitally signed files to replace existing files safely. Currently, signed files are distributed through:

1. Windows Service Packs
2. Hotfix distributions
3. Operating system upgrades
4. Windows Update
5. Windows Device Manager

The main reason for using this utility is when you suspect there may be a problem with a Windows XP system file.

Perhaps you get a dialog box appear informing you of a problem with a .dll file, or your program will just not load! It is therefore worth checking to see if there are any corrupt system files using sfc scannow.

To do this simply go to the Run box on the Start Menu and type in:
sfc /scannow

This command will immediately initiate the Windows File Protection service to scan all protected files and verify their integrity, replacing any files which has a problem.

The following should appear to give an indication of how long the process is taking.


Any corrupt, missing or incorrect files would be replaced by this process. The most common issue with scannow sfc is the following dialog box appearing:


When does this happen?

In the computer's operating system registry, are several settings that are checked when you run scannow sfc.
The Windows File Protection service constantly monitors for any changes to the main system files.

Well Windows XP keeps a cache (copy) of these essential files at the following location:
C:WINDOWS\System32\Dllcache (assuming C: is your system root)

The dllcache folder is extremely important so Windows XP hides it from you! To view it go to:
My Computer--> Tools--> Folder Options--> View--> "uncheck" Hide protected operating system files.

If that's the case on your computer then there is normally no need for the original XP CD to be inserted as your computer has a "copy" it can get hold of in this cache.

But, if the Dllcache folder, or part of it, has become corrupted for some reason then you will be prompted for the XP CD - so your computer can get a clean copy.

Thursday, November 25, 2010

Use Disk Cleanup In Windows XP

The Disk Cleanup tool helps you free up space on your hard disk by searching your disk for files that you can safely delete. You can choose to delete some or all of the files. Use Disk Cleanup to perform any of the following tasks to free up space on your hard disk:

1. Remove temporary Internet files.
2. Remove downloaded program files. For example, ActiveX controls and Java applets that are downloaded from the Internet.
3. Empty the Recycle Bin.
4. Remove Windows temporary files.
5. Remove optional Windows components that you are not using.

You can start Disk Cleanup, by doing any of the following:

Click Start, and then click Run. In the Open box, type cleanmgr, and then click OK.

or

Click Start, point to All Programs, point to Accessories, point to System Tools, and then click Disk Cleanup.

Tuesday, November 23, 2010

How To Add A Printer

When installing a new printer with the Add Printer Wizard, you can choose between adding a local printer (one that's directly cabled to your computer through one of the ports) or a network printer (printer that's connected to your network with an Ethernet connection, just as your computer is connected to the LAN).

To install a new local printer with the Add Printer Wizard, follow these steps:

Sharing Files In Windows Xp

Once you configure your computer to share files, you no longer have to copy files to a floppy disk or USB flash drive to transfer them to another computer. open them from other computers connected to the network, just like you’d open files that are stored on a single computer. You can also choose to have folders visible but not modifiable from other computers on the network.

To share files on your computer follow the steps below:

1. Log on to the computer as an administrator

Thursday, November 18, 2010

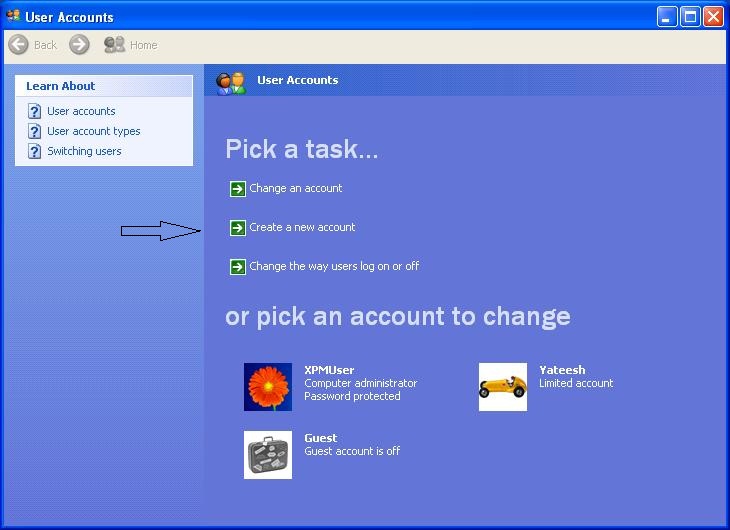
Create User Accounts From Control Panel

Follow The Steps Below to Create a new account from Control Panel:
  • To create a new account
  • Click Start--> Click Control Panel--> Then Click on User Accounts.

  • Click Create a New Account in the User Accounts window.


Managing User Accounts

Managing User Accounts

1. Understand The Nature Of User Accounts
2. Create A New Account
3. Change An Account Type
4. Change The Way Users Log On And Log Off

Understanding User Accounts:

A user is someone who uses a computer. A user account defines, what a user can do using Windows XP
In Windows XP, there are three types of user accounts.

Administrator account:
 The administrator can do everything with the computer and can do anything he or she desires, essentially giving them control over the entire computer, including other accounts. The administrator account can never be disabled or deleted.

Standard account:
 Users with standard accounts can install programs and hardware, change pictures and related personal data, and create, change, or remove his or her password.

Guest account:
 The guest account doesn't require a password, can't add or remove programs from the computer, and is disabled by default. This account type is great for children or students.

To easily manage user accounts, click the User Accounts icon in the Control Panel.


Monday, November 15, 2010

Send A File While On A Remote Assistance Session

During a Remote Assistance session, you can send files from your computer to the remote computer. For example, you may send a file that is needed to fix a problem on the remote computer. This requires action by both parties, the helper who sends the file and the requestor who must accept it and save it.

To send a file when helping someone via Remote Assistance:

1. In the chat dialog box, click Send a File, and then type the file path or click Browse and choose the file that you want to send.

2. Select the file and click Send File.

Friday, November 12, 2010

Start Remote Assistance Session by Sending a File

If you use Web-based e-mail such as Gmail or other similar services, you can use Remote Assistance by saving your request as a file and attaching it to an e-mail and send it to the Texpert.

Follow the steps below to invite a texpert to help you via Remote Assistance:

1. Click Start, click Help and Support, and then click Invite a friend to connect to your computer with Remote Assistance. This is located under the Ask for assistance heading.

2. Click Invite someone to help you, and then select Save Invitation as a file.

Start a Remote Assistance Session from Windows Messenger

Presuming you are seeking help from a Texpert and to send a Remote Assistance request via instant messaging.

1. Start Windows Messenger and Sign In.
2. In your list of contacts, select a person to ask for help. You will send an invitation to this person, asking them to start Remote Assistance and provide you with help. He or she must be online.
3. Click Tools, click Ask for Remote Assistance, and choose the e-mail address for a contact.

-or-

(If you are already exchanging messages in the Conversation window, click the Invite button, point to To Start Remote Assistance, and then click the contact you want to invite).

Tuesday, November 2, 2010

Hard Disk Drive Partitions In Windows XP

Method 1:  Disk Management is part of Adminstrative Tools. In Windows XP, you can find Adminstrative Tools in the Control Panel.

Method 2:  Click Start and then click the Run. In the Open text box type: diskmgmt.msc and click OK.


Friday, October 29, 2010

How To Create Local User Accounts

In a workgroup environment, a local user account must be created on each computer to which a specific user needs to gain access.

To create a user account in a workgroup: Follow the steps below

1. Click Start, right-click My Computer, and then click Manage.

2. In the Computer Management console, expand Local Users and Groups, right-click Users, and then click New User OR Right click on the empty space in the right pane and then click on the "NEW USER"

Wednesday, October 13, 2010

Remove Default Desktop Icons.

How to Remove Default Desktop Icons in Windows XP:

1. Click Start, and then click Control Panel.

2. Double-click Display, click the Desktop tab, and then click Customize Desktop.

3. Click to select the check boxes for the desktop items that you want to display, or click to clear the check boxes for the desktop items that you want to remove.

Search This Blog