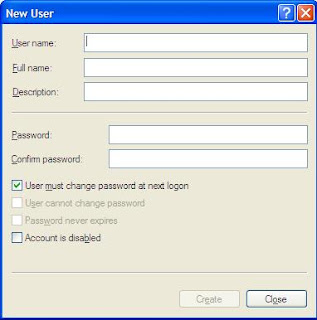
To create a user account in a workgroup: Follow the steps below
1. Click Start, right-click My Computer, and then click Manage.
2. In the Computer Management console, expand Local Users and Groups, right-click Users, and then click New User OR Right click on the empty space in the right pane and then click on the "NEW USER"
3. In the New User dialog box, enter the User Name, the Full Name (optional), and then a Description (optional).
4. Type a password, and then confirm the password.
Important: Although a password is optional, you should always assign a password to accounts that you create, to increase network security.5. Select either User must change password at next logon (recommended) or User cannot change password, and then select Account is Disabled unless the user will begin using the account soon.
Note: You can select or deselect the options mentioned in Step 5, and you can also disable or enable an account, by right-clicking a user in the right pane and then clicking Properties.6. Click Create.


No comments:
Post a Comment