Showing posts with label Windows Xp Operating System. Show all posts

Friday, March 25, 2011

Keep Start Menu Open and Open Applications

Keep Start Menu From Closing After Opening Applications

If you want to open more than one application without having to navigate through the whole start menu again, you can use a little-known trick to keep the start menu open after you click on an item.

Just hold down the shift key while you click on an item under the All Programs group, and you’ll notice the start menu stays up while the application loads in back of it. Notice how the notepad window has focus.


There are a few caveats (limits or restricts):

1. This only works on the All Programs menu if you are using the XP-style menu in XP.

2. This doesn’t work at all with the Vista-style start menu.

3. Works perfectly if you are using the Classic Start menu in either Vista or XP.

4. Some applications will demand focus
and make it close anyway.

Friday, February 4, 2011

Switch Users From the Task Manager


When a user initiates the Switch User option, the computer returns to the Welcome screen. The current user's session remains active and another user can now log on and use the computer. You can initiate the Switch User command in any of the following ways:


Thursday, February 3, 2011

Windows Defender In Windows XP


Your home page or search engine has changed by itself. Your Web browser contains buttons that you're pretty sure you didn't put there. You see pop-up ads even when you're not connected to the Internet. Or maybe your computer just seems to be running more slowly. These can all be symptoms of spyware.


Desktop Shortcut to Lock Your Computer

You secure your computer by locking it whenever you're away from your desk. If you are on a domain, by pressing Ctrl+Alt+Del and then clicking Lock Computer, you can prevent unauthorized users from gaining access to your computer. Only you and members of the Administrators group on your computer can unlock it.

Follow the below steps to accomplish the task.

1. Right-click an open area of your desktop--> point to New--> and then click Shortcut.


Wednesday, February 2, 2011

Disable Balloon Tips in the Notification Area

This task contains steps that tell you how to modify the registry. However, serious problems might occur if you modify the registry incorrectly. Therefore, make sure that you follow these steps carefully. For added protection, back up the registry before you modify it. Then, you can restore the registry if a problem occurs.

Click here: To back and restore registry
To disable balloon tips in the notification area, follow these steps:

1. Click Start--> click Run--> type regedit--> and then press ENTER.


Tuesday, February 1, 2011

Change Windows XP Start Menu to Classic View

To change the Start menu to the classic Start menu follow the below steps:

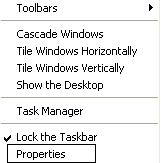
1. Right click on an empty space on the taskbar--> select properties

Or

   Click Start--> Click Control Panel--> double-click Appearance and Themes.


Windows Classic Theme in Windows XP

If you want the Windows Classic desktop feel and functionality, you can change the desktop theme to the Windows Classic theme:

1. Right-click an empty space on the desktop--> and then click Properties.


2. On the Themes tab--> click Windows Classic in the Theme box.


3. Click OK.

Wednesday, January 19, 2011

Restore My Documents Folder to Its Default Location

By default, the target or actual location of the My Documents folder is C:\Documents and Settings\user name\My Documents, where C is the drive in which Windows is installed, and user name is the currently logged-on user. You can change the target if you want My Documents to point to a different folder location Or bring it back to its default location if it has been moved.

To restore the My Documents folder to its default location, follow these steps:

1. Click Start--> and then point to My Documents.


Monday, January 10, 2011

Enable Secure FTP in Windows XP Professional

Make use of FTP server that comes with Windows XP Professional.


We need to be aware of this:


FTP server is good to do file transfer and copying, but the drawback is the communication traffic is sent without encryption, so the FTP login username and password will be seen if somebody sniffs the communication traffic. The better option is to use secure FTP with encryption feature.


1) Go to Start--> and click Control Panel. Control Panel Window will appear--> and then double click Add or Remove Programs.


2) Add or Remove Programs window will appear--> then click Add/Remove Windows Components.


Friday, December 31, 2010

Making Folder Private In Windows XP


                Making folder private in Windows XP would restrict others from accessing that private folder. It would also disable folder sharing feature.

1) Open your Windows Explorer and locate the folder which you want to set private. Right click the folder and click Sharing and Security.


Thursday, December 30, 2010

Checking Network Card Driver Status

How to Check Network Card Driver Status in Windows XP?

You might lose network connection due to corrupted or incompatible network card driver after installing or upgrading. Follow the below steps to check card status in Windows XP.


1) Go to Start and click on Control Panel.

2) Control Panel window will appear. Double click on Network Connections.

3) Network Connections window will appear. Right click correct Local Area Connection by identifying correct card and click Properties.

4) Local Area Connection Properties will appear. Click on Configure.

5) From the device status, it shows the driver status. If there is problem with the driver, you can click Troubleshoot to troubleshoot the problem with detailed instructions provided by Windows XP.

Note: The Troubleshoot feature which provided by Windows XP is pretty lengthy, but it’s a good resource to learn more about this device driver.


Saturday, December 25, 2010

Turn on Clicklock in Windows XP

Dragging the objects in Windows XP requires to hold the mouse button until the object is not dropped to the destination where you need to place it. Users may feel not comfortable by holding the mouse button for dragging the object so it is better to utilize the option clicklock to automatically lock the button while you are dragging the objects.

To turn on click lock follow the below steps:

1. Click Start--> Click Control Panel.

Friday, December 24, 2010

Erase Files From A CD-RW Disc In Windows XP:

If your computer is equipped with a CD recorder that supports CD rewritable (CD-RW) discs, you can erase and then reuse the rewritable disc.

How to Erase Files From a CD-RW Disc:

1. Double-click the My Computer icon on your desktop.

2. In My Computer--> right-click the CD recording drive--> and then click Open. Windows displays a temporary storage area where files are held before they are copied to the CD. Files or folders that are located in the temporary storage area are listed in the Files Ready to Be Written to the CD box.

3. In the CD Writing Tasks pane--> click Erase this CD-RW--> The Welcome to the CD Writing Wizard dialog box is displayed.

4. After you click Next--> the Erasing the CD dialog box is displayed and the progress bar displays the progress of the process.

5. When the process is finished--> you receive a message in the notification area and you can use the CD-RW disc.

Note: Not all CDs are erasable. If the CD that you are using is not erasable, then this feature is not available.

Add or Change A User's Picture In Windows XP

You can have a picture displayed next to the user name on the Welcome screen and on the new Start menu.

A picture is automatically assigned to each user account. To change this picture:

1.Click Start--> Click Control Panel--> In Control Panel double-click User Accounts.

2. Click the account for which you want to change the picture.

3. Click Change the picture.

4. Click a picture in the window--> or click Browse for More Pictures--> and then click the picture that you want to use.

5. When this picture is highlighted in the window--> click Change Picture.

Create A Password Reset Disk In Windows XP

Create A Password Reset Disk Using An Administrator Account:

Note: The following task requires one blank, formatted floppy disk.

If you logged on to the computer by using an administrator account, follow these steps to create a password reset disk for a user account:

1. Click Start--> and then click Control Panel.

2. In Control Panel--> click User Accounts.

3. In the User Accounts pane--> click the account that you want to work with.

4. Under Related Tasks--> click Prevent a forgotten password to start the Forgotten Password Wizard--> and then click Next.

5. Insert a blank--> formatted disk into drive A--> and then click Next.

6. In the Current user account password box--> type the password for the user account that you chose--> and then click Next.

Note: If the user account does not have a password, do not type a password in the Current user account password box.
The Forgotten Password Wizard creates the disk.

7. When the Progress bar reaches 100% complete--> click Next--> and then click Finish.

8. Remove and then label the password reset disk. (Store the disk in a safe place).

Disable Local Administrator Account In Windows

Before you disable the local Administrator account, make sure that there is at least one other local or network user who can gain access to the computer with administrator permissions. Otherwise, you will not be able to reverse this action in the future.

1. Log on as Administrator--> or as a user with administrator permissions.

2. Right-click My Computer--> and then click Manage.

3. In the left pane--> expand the Local Users and Groups--> and then click Users.

4. In the right pane--> double-click the Administrator account.

5. On the General tab--> select the Account is disabled check box--> and then click OK.

6. Quit the Computer Management console. The new setting takes effect the next time you attempt to log on to this computer.

Wednesday, December 22, 2010

Reset Internet Protocol (TCP/IP)

One of the components of the Internet connection on your computer is a built-in set of instructions called TCP/IP. TCP/IP can sometimes become damaged or corrupted. If you cannot connect to the Internet and you have tried all other methods to resolve the problem, TCP/IP might be causing it.
Because TCP/IP is a core component of Windows, you cannot remove it. However, you can reset TCP/IP to its original state by using the NetShell utility (netsh).

Follow the below steps to use the reset command to reset TCP/IP manually:

1. To open a command prompt--> click Start and then click Run. Type the following command in the Open box and then press ENTER:
cmd

2. At the command prompt--> type the following command and then press ENTER:
netsh int ip reset c:\resetlog.txt

Note: If you do not want to specify a directory path for the log file, use the following command:

netsh int ip reset resetlog.txt

3. Reboot the computer.

When you run the reset command, it rewrites two registry keys that are used by TCP/IP. This has the same result as removing and reinstalling the protocol. The reset command rewrites the following two registry keys:

Disable Automatic Search For Network Printers And Folders

Windows XP monitors shared resources on the network to make it easier to connect to a shared resource. This feature, which is new in Windows XP, is implemented by periodically scanning the computers on the network. During the scan, Windows XP identifies any newly-shared resources, such as a printer that has just gone online as a shared printer, or a folder that has just been shared.

Some users have a limited scope to their daily tasks. They only need to have access to one or two shared folders, usually document folders that are stored on file servers that hold documents that are related to their job descriptions, In this case, the discovery of new printers and new shared folders is not important or needed.

Method 1: Disable the automatic search for network printers and folders by changing folder options:

To disable the automatic search for network printers and folders, follow these steps:

1. Click Start--> click Control Panel--> click Appearance and Themes--> and click Folder Options to open the Folder Options dialog box.

2. Click the View tab.

3. In the Advanced Settings list, click to clear the Automatically Search for Network Folders and Printers check box.

4. Click OK.

Method 2: Disable the automatic search for network printers and folders by changing the registry key.

To change the registry key to disable automatic search for network printers and folders , follow the below steps:

1. Click Start--> Click on Run--> Type Regedit--> Press Enter on the keyboard Or Click on Ok

2. Locate the following registry subkey:
HKEY_CURRENT_USER\Software\Microsoft\Windows\CurrentVersion\Explorer\Advanced


3. Right-click System--> point to New--> and then click DWORD Value.

4. Type NoNetCrawling--> and then press ENTER.

5. Double-click NoNetCrawling.

6. In the Value data box--> type 1--> and then--> click OK.

7. Close Registry Editor.

Search This Blog