Showing posts sorted by date for query folder options. Sort by relevance Show all posts

Thursday, June 9, 2011

Offline Files do not synchronize

Offline Files follow a basic synchronization routine, depending on what items you have selected on the Offline Files tab of Folder Options. You can make adjustments on this tab, but you can also use the synchronization tool to manage synchronization.

To make changes to the way Offline Files synchronize, follow these steps:


1. Click Start--> All Programs--> Accessories--> Synchronize.


2. In the Synchronization window--> you see your offline files. If you want to stop synchronizing an offline file--> simply clear its check box and the file will no longer be synchronized.

3. If you want to change the way items are synchronized--> click the Setup button. You’ll see some tabs that enable you to determine when synchronization should occur--> and you can even create a schedule if you like.

Wednesday, June 8, 2011

I can’t get Offline Files to work

Offline Files has to be turned on and configured before you can use it on your computer.

To turn on and configure Offline Files, follow these steps:


1. To set up Offline Files--> open Folder Options in Control Panel--> click the Offline Files tab.


2. On the Offline Files tab--> click the Enable Offline Files check box--> You can then make some additional configurations as desired.

For example: you can choose to have Windows synchronize offline files when you log on/log off, and even the amount of disk space that offline files can use.

3. When you are done--> click OK.

4. You can now access the desired network resource, right-click it, and click Make Available Offline.

Prevention:

Offline Files is not compatible with Fast User Switching. In order to set up
Offline Files, you must first disable Fast User Switching with the Users icon in Control Panel.

wrong program opens a file

What are file extensions?

File extensions identify the type of file. For example, let’s say that you create a document with Microsoft Word. That document name has a .doc extension. This extension allows
Windows XP and other programs to know what kind of file it is. Using the extension, Windows XP can then try to determine what program should be used to open the file. All files have some kind of extension that identifies them.

Windows XP is able to understand file extensions, and therefore take a guess at the program you might want to use in order to work with the file. For example, Windows XP knowsthat mypic.jpeg is a picture file, and Windows XP uses Windows Picture and Fax
Viewer to open the file. The problem is that Windows XP’s guesses may be wrong and you may want a different program to open a particular file.

To solve the file/program problem, follow these steps:

1. Right-click the file that is giving you problems--> click Open With--> Choose Program. If the Open With option does not appear--> click Open.

2. In the Open With window--> choose the program to use. If you always want Windows to open the same kind of file with the same program--> select the "Always Use the Selected Program to Open This Kind of File check box". If the program you want to use is not listed--> click the Browse button to locate it. Click OK when you are done.

3. You can also configure the same option using the Folder Options icon in Control Panel. Open the icon and click the File Types tab.

4. In the File Types window--> locate the file type.

Note
If you want to change a file/program association, you can make the change in either of the two ways previously described—you don’t have to do both in order to make the change.

Tuesday, June 7, 2011

Know the Size, Type of a File in a Folder

Windows XP gives you a number of options that can be displayed with a file.
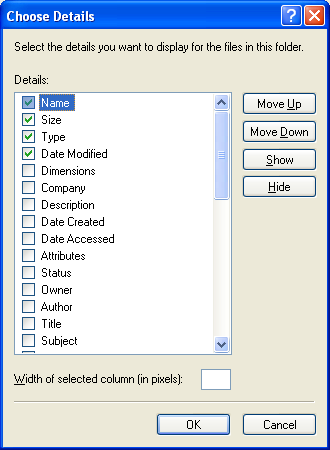
For example, let’s say you are looking at a bunch of files in a folder. With the right configuration, you can see not only the names of the files, but also their size, type, who created them, and other details. You can easily determine what details you want to display for files in a folder.

To make changes to the details settings of files

  1. open the folder and click the View menu.
  2. Click--> the Choose Details option--> a Choose Details window appears 
  3. Click the details you want presented with the file--> click OK
You can come back to this window and change the detail items you want to see at any time.

Things in my folders are too big or small


Windows XP supports a number of different folder features. For example, you can see the icons in a simple list, by small icons, by thumbnails, and a number of other options. If the icons are too big, you have to scroll all over the place to see what is in the folder if things are too small, you may have difficulty seeing them. No problem, You can easily change how things look in your folders.

On the folder that you want to change, just click the--> View menu on the top toolbar. You see a section containing different file view options, choose the option you want by clicking it. You can return to this menu at any time and try a different setting.


Saturday, April 2, 2011

System Restore settings Windows XP

 
one or more drive letters may be missing in the list of Available Drives in system restore. As a result, monitoring may not be enabled for the missing drives. 

Your response Issue: When you open System Restore settings, one or more drive letters may be missing in the list of Available drives. As a result, monitoring may not be enabled for the missing drives.


Repair Boot.ini in Windows XP


The boot.ini file is a hidden file that is used to identify in what folder on which partition and on which hard drive Windows XP is located. Boot.ini can become damaged, corrupted or deleted for a number of reasons and is usually brought to your attention by an error message.

Thursday, March 31, 2011

Cannot Activate Windows XP


Blank Activate Windows page in the Windows Product Activation Wizard.

Cause:
  • This issue can occur for any one of the following reasons:
  • Your registry is damaged or has been modified.
  • Files became damaged during the Windows XP installation, or files are missing.
  • You have a video resolution problem.
Important: This task contains steps that tell you how to modify the registry. However, serious problems might occur if you modify the registry incorrectly. Therefore, make sure that you follow these steps carefully. For added protection, back up the registry before you modify it. Then, you can restore the registry if a problem occurs.

Note: If the 30-day activation window has ended, you can start the computer in Safe mode to complete these steps.

Monday, March 28, 2011

Uninstall PowerDVD from Windows XP


Issue:
Cannot uninstall PowerDVD within the Windows ‘Add or Remove Programs’

Cause:

PowerDVD program is damaged or PowerDVD did not install correctly.

Solution:

Reboot PC

• Download Microsoft cleanup tool from. To down load; proceed to the following link http://download.microsoft.com/download/e/9/d/e9d80355-7ab4-45b8-80e8-983a48d5e1bd/msicuu2.exe

To execute the Microsoft cleanup tool, follow these steps:
(1) Click “Start”--> click “All Programs”--> and then click “Windows Installer Clean Up”.

(2) In the Windows Installer Clean Up box--> select “PowerDVD”.

(3) Click Remove

Safe Mode Boot options in Windows XP


Definition:

Safe Boot options load a minimal set of drivers, in which non-essential systems are shut down and only essential are active. You can use these options to start Windows so that you can modify the registry or load or remove drivers.

Thursday, February 10, 2011

Copy files to the new user profile In Windows XP


When you copy user data into a new profile, the new profile becomes a near duplicate of the old profile, and contains the same preferences, appearance, and documents as the old profile. If your old profile is corrupted in some way, you can move the files and settings from the corrupt profile to a new profile.


Monday, January 24, 2011

Windows XP Explorer Tips

Display Folder Path in Explorer Title Bar


When you open a subfolder from Explorer in Windows XP, such as C:\Downloads\Graphics or C:\Multimedia Files\Graphics,
only the name of the subfolder, i.e. "Graphics", appears in the folder's title bar. If you have multiple folders on your computer with the same name, it may prove confusing to determine the full path of a particular opened folder. For
example, if the Taskbar contains two buttons representing a folder "Graphics", which button relates to which folder?

Saturday, January 22, 2011

Schedule Tasks in Windows XP


With Scheduled Tasks, you can schedule any script, program, or document to run at a time that is most convenient for you. Scheduled Tasks starts every time that you start Windows XP and runs in the background, and it starts each task that you schedule at the time that you specify when you create the task.

To open Scheduled Tasks:

1. click Start--> click All Programs--> point to Accessories--> point to System Tools--> and then click Scheduled Tasks.


To schedule a new task:

1. Double-click Add Scheduled Task to start the Scheduled Task Wizard, and then click Next in the first dialog box.


2. The next dialog box displays a list of programs that are installed on your computer, either as part of the Windows XP operating system, or as a result of software installation.


Use one of the following procedures:

  • If the program that you want to run is listed, click the program, and then click Next.
  • If you want to run a program, script, or document that is not listed, click Browse, click the folder and file that you want to schedule, and then click Open.
3. Type a name for the task, and then choose one of the following options:
  • Daily
  • Weekly
  • Monthly
  • One time only
  • When my computer starts (before a user logs on)
  • When I log on (only after the current user logs on)

4. Click Next--> specify the information about the day and time to run the task--> and then click Next.

Note that the information about the day and time to run the task vary depending on the selection that you made in the previous wizard dialog box. For example, if you chose Weekly, you must indicate the day of the week, the time, and if the task should run every week, every 2 weeks, every 3 weeks, and so on.


5. Type the name and password of the user who is associated with this task. Make sure that you choose a user with sufficient permissions to run the program. By default, the wizard selects the name of the user who is currently logged on.

6. Click Next--> and then click Finish after you verify the choices that you have made. 

Monday, January 10, 2011

Enable Secure FTP in Windows XP Professional

Make use of FTP server that comes with Windows XP Professional.


We need to be aware of this:


FTP server is good to do file transfer and copying, but the drawback is the communication traffic is sent without encryption, so the FTP login username and password will be seen if somebody sniffs the communication traffic. The better option is to use secure FTP with encryption feature.


1) Go to Start--> and click Control Panel. Control Panel Window will appear--> and then double click Add or Remove Programs.


2) Add or Remove Programs window will appear--> then click Add/Remove Windows Components.


Saturday, January 8, 2011

Setting Up and Configuring Alerts In Messenger


How To SetUp and Configure Alerts

1. Go to the following Microsoft Web site: http://alerts.microsoft.com/
A "Welcome to Microsoft .NET Alerts" Web page opens.


2. Sign in by using your Passport.

3. Click Sign up for Microsoft .NET Alerts.

4. On the General Settings Page, specify where you want your .NET Alerts to be delivered. You can specify any of the following locations:

 Your computer, using Windows Messenger
 Your mobile device
 Your e-mail inbox


5. Click Choose .NET Alerts providers.

6. Click a name or logo to set up or to change alerts from that provider. Providers to choose from are:

 MSN Money
 MSN Calendar
 MSN Carpoint
 MSN Music
 eBay
 FYE
 uBid Online Auctions
 McAfee.com


7. Go to the provider that you choose, and follow the instructions for setting up or changing .NET Alerts for that provider.

Friday, January 7, 2011

Remove Windows Recovery Console In Windows XP

After installing Windows Recovery Console there may be time that you may need to remove Recovery Console due to an Operating system upgrade, disk maintance etc.

Please follow these steps below to accomplish this task:

1. Log on as local administrator.


2. Double click on "My Computer" icon on the desktop.

3. In "My Computer"  open: Tools--> Folder Options--> View--> Mark the checkbox

"Show hidden files and folders" and clear the "Hide protected operating system files" checkbox (please press on "Yes" to the confirm message).
 

4. Double click on the %systemdrive% (usually "C" drive) and delete "cmdcons" folder and the cmldr file from the root drive.

5. Right-click boot.ini on the system partition and select Properties, then clear the "Read-only" checkbox.

6. Double click on the "boot.ini" file (The file resides in the root of the %systemdrive%).

7. Remove the line C:\CMDCONS\BOOTSECT.DAT="Microsoft Windows Recovery Console" /cmdcons

8. Save the boot.ini file and close the text editor.

Wednesday, January 5, 2011

Change File Association In Windows XP

When you double-click a file to open it, Windows XP examines the file name extension. If Windows XP recognizes the file name extension, it opens the file in the program that is associated with that file name extension.


However, you can change the program that is associated with recognized file name extensions so that Windows XP opens all files that have this extension in the new associated program.


To display file name extensions


Depending on your settings, the file name extensions of your files may not be visible. To display the file name extensions of your files if they are not visible, follow these steps:


1. Open My Computer or Windows Explorer.


2. On the Tools menu--> click Folder Options.


3. Click the View tab.


4. In the Advanced settings box--> click to clear the Hide extensions for known file types check box.


5. Click OK.


Important:


1. You cannot use this method for a file that does not have a file name extension, or for a file that has an (.exe, .com, or .bat extension).


2. If you change the program that Windows uses to open a certain kind of file, and that program was not designed for the type of data in that file, the files may not appear correctly in the program. To be safe, note the name of the program that Windows previously used to open the file type so that you can reverse your settings if it is necessary.

How to add an item to the "Send To" menu

How to add an item to the "Send To" menu

When you right-click a file name or a thumbnail in Microsoft Windows XP, you see a shortcut menu for that file. One of the items on the menu is Send To, which enables you to quickly e-mail a file, copy it to your desktop, or copy it to a floppy disk.

Sometimes what you really want to do is to save a copy of the file to a specific folder on your computer. If you have a folder where you frequently place files, you can add that folder’s name to the list of locations on the Send To menu. This can save you the time of opening another Windows Explorer window and copying the file from one folder to another.

For example, you could create a My Pictures folder and then use the Send To menu to copy your best pictures to that folder.


To add a folder to the Send To menu

1. Click Start. Then, click My Computer.


2. In the My Computer window, click the Tools menu, and then click Folder Options.


3. Click the View tab. Under Hidden files and folders, click Show hidden files and folders, and then click OK.


4. In the My Computer window, double-click Local Disk (C :), double-click Documents and Settings, double-click your user name, and then double-click SendTo.


5. Click the File menu, click New, and then click Shortcut.


6. The Create Shortcut Wizard appears. Click the Browse button.


7. In the Browse For Folder dialog box, click the folder you want to add to your Send To menu, and then click OK.

8. Click Next.

9. Click Finish.


Now when you right-click a file and click Send To, the destination you selected will be an option on the Send To menu. You can create shortcuts to local or network programs, files, folders, computers, or Internet addresses.

Search This Blog