Showing posts with label Windows XP Pro support. Show all posts

Tuesday, July 19, 2011

My mouse pointer disappears when I am typing


Cause: Mouse pointers typically remain available when you are typing on the keyboard; however, a setting can be selected that makes the mouse pointer disappear when you are typing.

My mouse pointer moves too fast/slow


Cause: Mouse pointer speed can be a real pain if it is not configured correctly. Fortunately, if your mouse pointer moves too quickly or too slowly on the screen, you can easily fix the problem.

Saturday, July 16, 2011

I am left-handed, and I find right-clicking difficult

Cause: Mouse keys provide right and left buttons; but to left-handed people, who use the mouse on the left side, it sometimes feels wrong to find the right-click features on the right side. The good news is that you can easily reverse the keys so that the left key is the primary key and the right key is the secondary key. This means that right-click features will work on the left key and left-click features will work on the right key.

Thursday, July 7, 2011

I can’t uninstall a device


Cause: At some point, you may want to uninstall a device from Windows XP. For example, let’s say that you replace your keyboard with a newer model. Windows XP should detect that the old keyboard is no longer attached to the system and remove it. Sometimes, though, Windows XP may not get the message that a hardware device has been removed, and the device may keep showing up on your computer.

Hardware compatibility in Windows XP

Cause: Like all operating systems, most hardware works with Windows XP and some does not. Although many hardware devices are compatible with Windows, some simply are not designed for Windows XP. However, under most circumstances, the hardware devices that you purchase will be Windows compatible. Before buying hardware, you can save yourself a lot of grief if you do just a bit of homework first.

There are two main ways to determine if a device is compatible with Windows XP:

•  Look on the box while your money is still safe in your pocket. While you are at the store, read the outside of the box. It should say “Compatible with Windows XP” right on the box. If it does not, look for a “Compatible with Windows 2000” label. If you do not see either of these, try to find a device that has one of these labels. You’ll save yourself a lot of problems. If you are not sure, ask someone in the store for help.

•  Microsoft maintains a list of hardware that has been tested with Windows XP, called the Hardware Compatibility List (HCL). The HCL tells you what hardware is certain to work with XP, a good reason to check before ever upgrading a computer to Windows XP. However, this does not mean that if something is not listed on HCL that it will not work; it just means that Microsoft has not tested it. Still, the HCL is a great site to check before you buy a device. Check it out at http://www.microsoft.com/hcl. You can search by device and even brand name to see what items are listed.

Tip: If there is a device you want, but its compatibility with Windows XP is questionable, you can also try the manufacturer’s Web site for the latest information about compatibility with Windows XP.

Thursday, June 23, 2011

I don’t like the account icon feature

By default, Windows XP assigns a random icon to your user account. This icon
appears with your user name on the Welcome screen and also on the Start menu. However, you can change the icons and icon behavior using the User Accounts tool in Control Panel, if the computer is not a member of a Windows 2000/.NET domain, which is a large Windows network controlled by network administrators.

To change the icon feature, follow these steps:

1. Log on with the desired account--> or if you are an administrator, you can change other users’ accounts.

2. Click Start--> Control Panel--> User Accounts.

3. In the User Accounts window--> choose an account that you want to change.

4. In the What Do You Want to Change About Your Account screen--> click the Change My Picture option.

5. In the Pick a New Picture for Your Account screen--> select a picture that you want to use and click the Change Picture button.

6. You are not stuck with the default picture list; you can use your own pictures or pictures you download from the Internet. Click the Browse for More Pictures option, and an Open window appears in which you can locate and use a picture of your own. Windows XP can use virtually any picture file format for the icon (for example, BMP, GIF, JPEG, PNG, and so on). This feature allows you to use custom pictures and even photos of real people. For example, you could use a picture of an actual person for each user account.

I cannot enforce password restrictions

The default XP behavior allows users to create and modify their own passwords. As an administrator, you can access the User Accounts tool in Control Panel to create a password for a user. However, the user can change the password with the User Accounts tool after he or she logs on. If you are using Windows XP Home Edition, I’m afraid you are stuck. Users can always create a different password with the User Accounts tool, and there are no direct rules you can enforce. However, if you are using Windows XP Professional, you have an additional tool that you can use to enforce password restrictions.

To configure additional password restrictions in Windows XP Professional, follow these steps:

1. Log on with an administrator account.

2. Click Start--> Control Panel--> Administrative Tools--> Computer Management.

3. In the left pane of the Computer Management console--> expand Local Users and Groups and select the Users container. You can see a listing of user accounts on your computer in the right pane.

4. Right-click the desired user account and click Properties.

5. On the General tab--> you see a list of restriction options. You can make sure that the user has to change his or her password at the next logon, that the user cannot change his or her password, or that the password never expires--> Click the desired check box and click OK.

Note: If you like using the Local Users and Groups console, you can also create and delete user accounts here without using User Accounts in Control Panel. Just right-click the Users container and click New User. You can delete an account or manage its properties by right-clicking the account icon in the right window pane.

Wednesday, June 22, 2011

What makes a good password?

A password has to be something you can easily remember, but something other users cannot easily guess. As a general rule, passwords should be “complex,” which means they should be at least eight characters long and should use both letters (upper- and lowercase) and numbers. The names of your kids, pets, phone numbers, and other commonly known items should not be used as your password. Often, it is best to combine a couple of common items, such as your favorite pet, food, or automobile with some random numbers that you can remember.

Here are some examples of good passwords:
  • Parrot4598
  • OceAn45surf
  • JiMMy72ball
  • 14573porchE

Users are able to log on without passwords

By default, Windows XP allows the creation of user accounts without passwords. Users simply log on by clicking their account on the Welcome screen. Of course, this setup is not at all secure, and if you want to make sure no one logs on with someone else’s account, then all users need a password.

To configure a password, follow these steps:

1. Log on with the desired account.

2. Click Start--> Control Panel--> User Accounts.

3. Click the Create a Password option.

4. In the Create a Password for Your Account screen--> type your desired password--> type it again for confirmation--> and then enter a password hint if you like. This hint appears on the Welcome screen to help you remember your password; but all users can see the hint, so be careful that the hint does not give your password away.

5. Click Create Password.

Wednesday, June 15, 2011

I don’t want to use the Welcome screen

By default, Windows XP provides you with the Welcome screen, which gives an icon and a list of all users. In order to log on, you simply click your user name and provide your password, if necessary. However, you don’t have to use the Welcome screen if you don’t want to. Once removed, a standard Windows logon dialog box appears, in which you will have to type your user name and password.

Note
In cases where several people use a computer, such as in an office, you might want to remove the Welcome screen for added security. If you remove the Welcome screen, no one will know the user names of other people who log on to the computer.

To remove the Welcome screen, follow these steps:
 
1. Log on with an administrator account.

2. Click Start--> Control Panel--> User Accounts.

3. In the User Accounts window--> click the Change the Way Users Log On or Off option.

In the Select Logon and Logoff Options window--> clear the Use the Welcome Screen check box and click the Apply Options button.

Tuesday, June 14, 2011

My account does not work with .NET Passport

The .NET Passport feature enables you to integrate your user account with Internet sites in a safe way. Essentially, the .NET Passport allows you to sign into various Web sites that support .NET Passport with a single user name and password. The idea is to make Web usage easier and uniform with your user account. By default, accounts are not configured for .NET Passport support, but you can easily configure your account.

To configure your account for .NET Passport support, follow these steps:

1. Click Start--> Control Panel--> User Accounts.

2. In the User Accounts window--> click the Change an Account option.

3. If there is more than one user account on your computer--> a window appears that allows you to click the account you want to configure--> Click the desired account.

Prevention:

This window only appears if you are logged on with the computer administrator account. Additionally, you cannot enable someone else’s account for .NET Passport support unless you are logged on with the computer administrator account.

4. Click the Set Up My Account to Use a .NET Passport option.

5. The .NET Passport Wizard appears. In the first screen--> click Next. An Internet connection will be launched if you are not connected already.

6. In the Do You Have an E-mail Address screen--> you can choose to use your existing e-mail address or create a new one for free at MSN.com. Make a selection--> and then click Next.

7. Depending on your selection--> you will need to enter your e-mail address or sign up for a free e-mail address.

Thursday, June 9, 2011

I accidentally put stuff I need in the Recycle Bin

People often accidentally put items in the Recycle Bin that do not belong there when dragging and dropping. The good news is that the Recycle Bin is just a folder, and is mostly like other folders on your computer. Since the Recycle Bin does not automatically delete items when they are put in the folder, you can get the files back.

Solution:

Open Recycle Bin--> drag the file you want to keep out of the Recycle Bin or to another place on your computer--> such as My Documents. The file has not been harmed in any way.

Offline Files do not synchronize

Offline Files follow a basic synchronization routine, depending on what items you have selected on the Offline Files tab of Folder Options. You can make adjustments on this tab, but you can also use the synchronization tool to manage synchronization.

To make changes to the way Offline Files synchronize, follow these steps:


1. Click Start--> All Programs--> Accessories--> Synchronize.


2. In the Synchronization window--> you see your offline files. If you want to stop synchronizing an offline file--> simply clear its check box and the file will no longer be synchronized.

3. If you want to change the way items are synchronized--> click the Setup button. You’ll see some tabs that enable you to determine when synchronization should occur--> and you can even create a schedule if you like.

Wednesday, June 8, 2011

wrong program opens a file

What are file extensions?

File extensions identify the type of file. For example, let’s say that you create a document with Microsoft Word. That document name has a .doc extension. This extension allows
Windows XP and other programs to know what kind of file it is. Using the extension, Windows XP can then try to determine what program should be used to open the file. All files have some kind of extension that identifies them.

Windows XP is able to understand file extensions, and therefore take a guess at the program you might want to use in order to work with the file. For example, Windows XP knowsthat mypic.jpeg is a picture file, and Windows XP uses Windows Picture and Fax
Viewer to open the file. The problem is that Windows XP’s guesses may be wrong and you may want a different program to open a particular file.

To solve the file/program problem, follow these steps:

1. Right-click the file that is giving you problems--> click Open With--> Choose Program. If the Open With option does not appear--> click Open.

2. In the Open With window--> choose the program to use. If you always want Windows to open the same kind of file with the same program--> select the "Always Use the Selected Program to Open This Kind of File check box". If the program you want to use is not listed--> click the Browse button to locate it. Click OK when you are done.

3. You can also configure the same option using the Folder Options icon in Control Panel. Open the icon and click the File Types tab.

4. In the File Types window--> locate the file type.

Note
If you want to change a file/program association, you can make the change in either of the two ways previously described—you don’t have to do both in order to make the change.

Tuesday, June 7, 2011

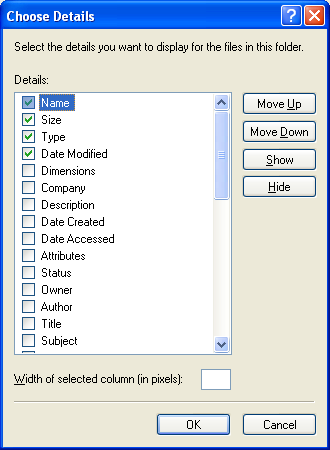
Know the Size, Type of a File in a Folder

Windows XP gives you a number of options that can be displayed with a file.
For example, let’s say you are looking at a bunch of files in a folder. With the right configuration, you can see not only the names of the files, but also their size, type, who created them, and other details. You can easily determine what details you want to display for files in a folder.

To make changes to the details settings of files

  1. open the folder and click the View menu.
  2. Click--> the Choose Details option--> a Choose Details window appears 
  3. Click the details you want presented with the file--> click OK. 
You can come back to this window and change the detail items you want to see at any time.

Saturday, June 4, 2011

Narrator reads too slowly


The Narrator feature reads text and dialog boxes that appear on your screen. If the Narrator reads too slowly, you can speed up the voice, and adjust the volume and pitch as well, by using the Voice Settings.

To adjust Voice Settings, just follow these steps:

1. Click Start--> All Programs--> Accessories--> Accessibility--> Narrator.

2. In the Narrator window that appears--> click the Voice button.

3. In the Voice Settings window that appears, increase the Speed value of the voice and the volume and pitch, if you like. Click OK when you are done.


Magnifier does not follow my mouse movements


Magnifier magnifies areas of the screen and is designed to track the mouse cursor, keyboard focus, or any text editing. However, these features have to be enabled. If the Magnifier does not work, then the mouse cursor option has not been turned on.

To turn on mouse cursor tracking, just follow these steps:

1. Click Start--> All Programs--> Accessories--> Accessibility--> Magnifier.

2. In the Magnifier Settings window that appears--> ensure that the mouse cursor tracking option is checked. Click Exit when you are done.

Friday, June 3, 2011

Accessibility in Windows XP

Windows XP supports accessibility features, which make's XP easier to use for people with certain disabilities. Windows XP even makes accessibility feature usage easier because a wizard is provided to help you configure the accessibility options.
  • You can find the wizard in Start--> All Programs--> Accessories--> Accessibility--> Accessibility Wizard.
Overall, the accessibility tools you find in Windows XP are moderately helpful, but they are not the best programs available in the marketplace. You can purchase additional programs that can help you work with Windows XP if you have hearing, visual, and tactile disabilities. 

Check out http://www.microsoft.com/enable


Thursday, June 2, 2011

Display Mycomputer as Menu In Windows XP


Cause: By default, Windows XP will show Control Panel on the Start menu as a 'link'.

This means that you have to click Control Panel to open it from the Start menu. However, you can change this link behavior to a menu so that you can access Control Panel icons directly from the Start menu. When you point to Control Panel on the Start menu, a submenu will pop out showing the icons.

Tuesday, May 17, 2011

Drag and Drop Items in Start Menu

Cause

Windows XP allows you to drag and drop items on the Start menu.

For example: let's say you are working on a document. You want that document to appear on the Start menu so you can easily access it while you are working on it. No problem, just drag and drop the document on the Start button. This creates a 'shortcut' to your document, it does not actually move the document to the Start menu, but just creates a shortcut to it. If you can't drag and
drop items, then you simply need to turn on the drag and drop feature.

To turn on dragging and dropping on the Start menu, follow these steps:


Search This Blog