Windows provides different ways, for you to arrange and identify your files when you view them in Windows XP special folders, such as the My Music, My Pictures, or My Videos folders. When a folder is open, you can use any of the viewing options, (located on the View menu).
Note: The arrangement options in each folder vary with the type of folder that you open. For example, the Filmstrip view is only available in folders containing pictures.
Choose which view type you would like to use,
Show in Groups:
When you use the Show in Groups option, you can group your files by any detail of the file, such as name, size, type, or date modified.
For example, if you group by file type, image files are displayed in one group, Microsoft Word files are displayed in another group, and Excel files in another. Show in Groups is available in the Thumbnails, Tiles, Icons, and Details views.
To show your files in groups--> on the View menu--> point to Arrange Icons by--> and then click Show in Groups.
Thumbnails View:
Thumbnails view displays the images on a folder icon which has the content so that you can quickly identify the folder.
For example, if you store pictures in several different folders, in Thumbnails view, you can tell at a glance which folder contains the pictures you want.
Windows displays up to four images on a folder background by default. You can also choose one picture to identify a folder in Thumbnails view. The complete folder name is displayed under the thumbnail.
Tiles:
Tiles view displays your files and folders as icons. The icons are larger than those in Icon view, and the type of information that you select is displayed under the file or folder name.
For example, if you sort your files by type, Microsoft Word document is displayed under the file name for a Microsoft Word document.
Filmstrip:
Filmstrip view is available in picture folders. Your pictures are displayed in a single row of thumbnail images. You can scroll through your pictures using the left and right arrow buttons. If you click a picture, it is displayed as a larger image above the other pictures.
To edit, print, or save the image to another folder, double-click the picture.
Icons:
Icons view displays your files and folders as icons. The file name is displayed under the icon; however, sort information is not displayed. In this view you can display your files and folders in groups.
List:
List view displays the contents of a folder as a list of file or folder names preceded by small icons. This view is useful if your folder contains many files and you want to scan the list for a file name. You can sort your files and folders in this view; however, you cannot display your files in groups.
Details:
In Details view, Windows lists the contents of the open folder and provides detailed information about your files, including name, type, size, and date modified. In Details view you can also show your files in groups.
Showing posts sorted by relevance for query folder options. Sort by date Show all posts
Showing posts sorted by relevance for query folder options. Sort by date Show all posts
Monday, December 13, 2010

Thursday, December 2, 2010
Add More Locations Or Destinations To the Send To Menu
By using the Send To command, you can quickly send a file to different locations including a floppy disk, your desktop, another person using e-mail, or the My Documents folder. The SendTo folder contains the shortcuts for the destinations that are displayed on the Send To menu. Every user on the computer has a SendTo folder and can customize its contents.
When you add new destinations to the SendTo folder, they appear on the Send To menu when you right-click a file, and then point the cursor Send To.
How to Use the Send To Command?
In Windows Explorer or My Computer--> right-click a file--> and then point to Send To. On the shortcut menu that appears--> click the destination where you want to send your file. The file is sent to or activated by the destination that you select.
Destinations on the Send To menu can include any of the following:
* Disk drives (local or network)
* Fax printers
* Printers* Windows-based programs
* Compressed (zipped) folders
* The desktop* Mail recipients
* The My Documents folder
By default, the Send To menu in Windows XP lists the following commands (destinations)
* Compressed (zipped) Folder
* Desktop (create shortcut)
* Mail Recipient* My Documents
* 3 1/2 Floppy (A:)
* CD Drive
Add a Destination to the Send To Menu:
To add a destination to the Send To menu, you must add a shortcut to the SendTo folder. To do this, follow these steps:
1. Click Start--> and then click Run.
2. In the Open box--> type sendto--> and then click OK.
3. Add a destination by doing one of the following:
* Use the drag-and-drop operation to move the item that you want to the SendTo folder; to do so--> right-click--> and then click Create Shortcuts Here.
-or-
* Point to New on the File menu--> and then click Shortcut.
Follow the instructions in the Create Shortcut Wizard. A new shortcut is created in the SendTo folder, and it is displayed on the Send To menu.
To open the SendTo Folder, you can also perform the following steps:
1. Click Start--> and then click My Computer.
2. Double-click the drive where Windows is installed (usually drive C, unless you have more than one drive on your computer).
3. If you cannot view the items on your drive when you open it--> under System Tasks--> click Show the contents of this drive.
4. Double-click the Documents and Settings folder.
5. Double-click the folder of the user whose SendTo menu you want to change (usually your own).
6. Double-click the SendTo folder.
7. The SendTo folder is hidden by default. If the folder is not visible, on the Tools menu--> click Folder Options--> and then on the View tab--> click Show hidden files and folders.
Remove a Destination from the Send To Menu
To remove a destination from the Send To menu, do the following:
1. Click Start--> and then click Run.
2. In the Open box--> type sendto--> and then click OK.
3. Right-click the shortcut that you want to remove, and then click Delete. The shortcut is removed.
When you add new destinations to the SendTo folder, they appear on the Send To menu when you right-click a file, and then point the cursor Send To.
How to Use the Send To Command?
In Windows Explorer or My Computer--> right-click a file--> and then point to Send To. On the shortcut menu that appears--> click the destination where you want to send your file. The file is sent to or activated by the destination that you select.
Destinations on the Send To menu can include any of the following:
* Disk drives (local or network)
* Fax printers
* Printers* Windows-based programs
* Compressed (zipped) folders
* The desktop* Mail recipients
* The My Documents folder
By default, the Send To menu in Windows XP lists the following commands (destinations)
* Compressed (zipped) Folder
* Desktop (create shortcut)
* Mail Recipient* My Documents
* 3 1/2 Floppy (A:)
* CD Drive
Add a Destination to the Send To Menu:
To add a destination to the Send To menu, you must add a shortcut to the SendTo folder. To do this, follow these steps:
1. Click Start--> and then click Run.
2. In the Open box--> type sendto--> and then click OK.
3. Add a destination by doing one of the following:
* Use the drag-and-drop operation to move the item that you want to the SendTo folder; to do so--> right-click--> and then click Create Shortcuts Here.
-or-
* Point to New on the File menu--> and then click Shortcut.
Follow the instructions in the Create Shortcut Wizard. A new shortcut is created in the SendTo folder, and it is displayed on the Send To menu.
To open the SendTo Folder, you can also perform the following steps:
1. Click Start--> and then click My Computer.
2. Double-click the drive where Windows is installed (usually drive C, unless you have more than one drive on your computer).
3. If you cannot view the items on your drive when you open it--> under System Tasks--> click Show the contents of this drive.
4. Double-click the Documents and Settings folder.
5. Double-click the folder of the user whose SendTo menu you want to change (usually your own).
6. Double-click the SendTo folder.
7. The SendTo folder is hidden by default. If the folder is not visible, on the Tools menu--> click Folder Options--> and then on the View tab--> click Show hidden files and folders.
Remove a Destination from the Send To Menu
To remove a destination from the Send To menu, do the following:
1. Click Start--> and then click Run.
2. In the Open box--> type sendto--> and then click OK.
3. Right-click the shortcut that you want to remove, and then click Delete. The shortcut is removed.
Wednesday, December 15, 2010
File Compression In Windows XP
Compressing files, folders, and programs decreases their size and reduces the amount of space they use on your volumes or removable storage devices. Volume compression decreases the amount of space that is used by all of the files and folders that are stored on that volume. Because of a potential loss of performance, you may not want to compress some files.
NTFS Compression:
This type of compression is available on volumes that use the NTFS file system, and NTFS compression has the following features and limitations:
1. You can use NTFS compression to compress individual files and folders, as well as an entire NTFS volume.
2. You can compress a folder without compressing its contents.
3. You can display NTFS-compressed file and folder names in a different color to make them easier to identify.
4. You may notice a decrease in performance when you work with NTFS-compressed files. When you open a compressed file, Windows automatically decompresses it for you, and when you close the file, Windows compresses it again. This process may decrease your computer performance.
5. NTFS-compressed files and folders only remain compressed while they are stored on an NTFS Volume.
6. You cannot encrypt an NTFS-compressed file.
How To Compress files or folders on NTFS Volume:
1. Click Start--> and then click My Computer.
2. Double-click the NTFS Volume that contains the folder or folders you want to compress.
3. Right-click the file or folder you want to compress, and then click Properties.
4. On the General tab--> click Advanced.
5. Click to select the Compress contents to save disk space check box--> and then click OK.
6. In the Properties dialog box--> click OK.
7. In Confirm Attribute Changes--> click the option you want.
Note: If you move or copy a file into a compressed folder, it is compressed automatically. If you move a file from a different NTFS Volume into a compressed folder, it is also compressed. However, if you move a file from the same NTFS Volume into a compressed folder, the file retains its original state, either compressed or uncompressed.
Display Compressed Files in Color:
You can change the display of files and folders that are compressed in Windows Explorer and My Computer, so it is easy to identify them.
To display compressed files in color:
1. Double-click Folder Options in Control Panel.
2. Click Start--> and then click Control Panel.
3. Click Appearance and Themes--> and then click Folder Options.
4. On the View tab--> click to select the Show encrypted or compressed NTFS files in color check box.
NTFS Compression:
This type of compression is available on volumes that use the NTFS file system, and NTFS compression has the following features and limitations:
1. You can use NTFS compression to compress individual files and folders, as well as an entire NTFS volume.
2. You can compress a folder without compressing its contents.
3. You can display NTFS-compressed file and folder names in a different color to make them easier to identify.
4. You may notice a decrease in performance when you work with NTFS-compressed files. When you open a compressed file, Windows automatically decompresses it for you, and when you close the file, Windows compresses it again. This process may decrease your computer performance.
5. NTFS-compressed files and folders only remain compressed while they are stored on an NTFS Volume.
6. You cannot encrypt an NTFS-compressed file.
How To Compress files or folders on NTFS Volume:
1. Click Start--> and then click My Computer.
2. Double-click the NTFS Volume that contains the folder or folders you want to compress.
3. Right-click the file or folder you want to compress, and then click Properties.
4. On the General tab--> click Advanced.
5. Click to select the Compress contents to save disk space check box--> and then click OK.
6. In the Properties dialog box--> click OK.
7. In Confirm Attribute Changes--> click the option you want.
Note: If you move or copy a file into a compressed folder, it is compressed automatically. If you move a file from a different NTFS Volume into a compressed folder, it is also compressed. However, if you move a file from the same NTFS Volume into a compressed folder, the file retains its original state, either compressed or uncompressed.
Display Compressed Files in Color:
You can change the display of files and folders that are compressed in Windows Explorer and My Computer, so it is easy to identify them.
To display compressed files in color:
1. Double-click Folder Options in Control Panel.
2. Click Start--> and then click Control Panel.
3. Click Appearance and Themes--> and then click Folder Options.
4. On the View tab--> click to select the Show encrypted or compressed NTFS files in color check box.
Wednesday, December 22, 2010
Disable Automatic Search For Network Printers And Folders
Windows XP monitors shared resources on the network to make it easier to connect to a shared resource. This feature, which is new in Windows XP, is implemented by periodically scanning the computers on the network. During the scan, Windows XP identifies any newly-shared resources, such as a printer that has just gone online as a shared printer, or a folder that has just been shared.
Some users have a limited scope to their daily tasks. They only need to have access to one or two shared folders, usually document folders that are stored on file servers that hold documents that are related to their job descriptions, In this case, the discovery of new printers and new shared folders is not important or needed.
Method 1: Disable the automatic search for network printers and folders by changing folder options:
To disable the automatic search for network printers and folders, follow these steps:
1. Click Start--> click Control Panel--> click Appearance and Themes--> and click Folder Options to open the Folder Options dialog box.
2. Click the View tab.
3. In the Advanced Settings list, click to clear the Automatically Search for Network Folders and Printers check box.
4. Click OK.
Method 2: Disable the automatic search for network printers and folders by changing the registry key.
To change the registry key to disable automatic search for network printers and folders , follow the below steps:
1. Click Start--> Click on Run--> Type Regedit--> Press Enter on the keyboard Or Click on Ok
2. Locate the following registry subkey:
HKEY_CURRENT_USER\Software\Microsoft\Windows\CurrentVersion\Explorer\Advanced
3. Right-click System--> point to New--> and then click DWORD Value.
4. Type NoNetCrawling--> and then press ENTER.
5. Double-click NoNetCrawling.
6. In the Value data box--> type 1--> and then--> click OK.
7. Close Registry Editor.
Some users have a limited scope to their daily tasks. They only need to have access to one or two shared folders, usually document folders that are stored on file servers that hold documents that are related to their job descriptions, In this case, the discovery of new printers and new shared folders is not important or needed.
Method 1: Disable the automatic search for network printers and folders by changing folder options:
To disable the automatic search for network printers and folders, follow these steps:
1. Click Start--> click Control Panel--> click Appearance and Themes--> and click Folder Options to open the Folder Options dialog box.
2. Click the View tab.
3. In the Advanced Settings list, click to clear the Automatically Search for Network Folders and Printers check box.
4. Click OK.
Method 2: Disable the automatic search for network printers and folders by changing the registry key.
To change the registry key to disable automatic search for network printers and folders , follow the below steps:
1. Click Start--> Click on Run--> Type Regedit--> Press Enter on the keyboard Or Click on Ok
2. Locate the following registry subkey:
HKEY_CURRENT_USER\Software\Microsoft\Windows\CurrentVersion\Explorer\Advanced
3. Right-click System--> point to New--> and then click DWORD Value.
4. Type NoNetCrawling--> and then press ENTER.
5. Double-click NoNetCrawling.
6. In the Value data box--> type 1--> and then--> click OK.
7. Close Registry Editor.
Wednesday, January 5, 2011
How to add an item to the "Send To" menu
How to add an item to the "Send To" menu
When you right-click a file name or a thumbnail in Microsoft Windows XP, you see a shortcut menu for that file. One of the items on the menu is Send To, which enables you to quickly e-mail a file, copy it to your desktop, or copy it to a floppy disk.
Sometimes what you really want to do is to save a copy of the file to a specific folder on your computer. If you have a folder where you frequently place files, you can add that folder’s name to the list of locations on the Send To menu. This can save you the time of opening another Windows Explorer window and copying the file from one folder to another.
For example, you could create a My Pictures folder and then use the Send To menu to copy your best pictures to that folder.


To add a folder to the Send To menu
1. Click Start. Then, click My Computer.

2. In the My Computer window, click the Tools menu, and then click Folder Options.

3. Click the View tab. Under Hidden files and folders, click Show hidden files and folders, and then click OK.

4. In the My Computer window, double-click Local Disk (C :), double-click Documents and Settings, double-click your user name, and then double-click SendTo.

5. Click the File menu, click New, and then click Shortcut.

6. The Create Shortcut Wizard appears. Click the Browse button.

7. In the Browse For Folder dialog box, click the folder you want to add to your Send To menu, and then click OK.

8. Click Next.

9. Click Finish.

Wednesday, December 22, 2010
Use Offline Files In Windows XP
Configuring your computer to use Offline Files
To make shared network files or folders available when you are offline:
NOTE: When you make other files available offline, they are displayed in the "Shortcut to Offline Files" folder.
Making files or folders unavailable offline
Right-click the offline file--> and then click the Make Available Offline command to remove the check. The file or folder is removed from the Offline Files folder.
Synchronizing Offline Files:
To manually synchronize an offline file
Right-click the file that you want--> and then click Synchronize. You must be connected to the network to synchronize files.
To edit the synchronization settings:
Monday, January 24, 2011
Windows XP Explorer Tips
Display Folder Path in Explorer Title Bar

When you open a subfolder from Explorer in Windows XP, such as C:\Downloads\Graphics or C:\Multimedia Files\Graphics,
only the name of the subfolder, i.e. "Graphics", appears in the folder's title bar. If you have multiple folders on your computer with the same name, it may prove confusing to determine the full path of a particular opened folder. For
example, if the Taskbar contains two buttons representing a folder "Graphics", which button relates to which folder?

When you open a subfolder from Explorer in Windows XP, such as C:\Downloads\Graphics or C:\Multimedia Files\Graphics,
only the name of the subfolder, i.e. "Graphics", appears in the folder's title bar. If you have multiple folders on your computer with the same name, it may prove confusing to determine the full path of a particular opened folder. For
example, if the Taskbar contains two buttons representing a folder "Graphics", which button relates to which folder?
Tuesday, January 11, 2011
Disable Simple File Sharing In Windows XP Professional
Follow the steps below to quickly disable simple file sharing in Windows XP Professional.
1) Go to Start--> and click on My Computer.
2) Select Tools--> and click on Folder Options.

1) Go to Start--> and click on My Computer.
2) Select Tools--> and click on Folder Options.

Monday, March 28, 2011
Safe Mode Boot options in Windows XP

Definition:
Safe Boot options load a minimal set of drivers, in which non-essential systems are shut down and only essential are active. You can use these options to start Windows so that you can modify the registry or load or remove drivers.
Safe Boot options load a minimal set of drivers, in which non-essential systems are shut down and only essential are active. You can use these options to start Windows so that you can modify the registry or load or remove drivers.
Uninstall PowerDVD from Windows XP

Issue:
Cannot uninstall PowerDVD within the Windows ‘Add or Remove Programs’
Cause:
PowerDVD program is damaged or PowerDVD did not install correctly.
Solution:
• Reboot PC
• Download Microsoft cleanup tool from. To down load; proceed to the following link http://download.microsoft.com/download/e/9/d/e9d80355-7ab4-45b8-80e8-983a48d5e1bd/msicuu2.exe
• To execute the Microsoft cleanup tool, follow these steps:
Cannot uninstall PowerDVD within the Windows ‘Add or Remove Programs’
Cause:
PowerDVD program is damaged or PowerDVD did not install correctly.
Solution:
• Reboot PC
• Download Microsoft cleanup tool from. To down load; proceed to the following link http://download.microsoft.com/download/e/9/d/e9d80355-7ab4-45b8-80e8-983a48d5e1bd/msicuu2.exe
• To execute the Microsoft cleanup tool, follow these steps:
(1) Click “Start”--> click “All Programs”--> and then click “Windows Installer Clean Up”.
(2) In the Windows Installer Clean Up box--> select “PowerDVD”.
(3) Click Remove
Thursday, February 10, 2011
Copy files to the new user profile In Windows XP

When you copy user data into a new profile, the new profile becomes a near duplicate of the old profile, and contains the same preferences, appearance, and documents as the old profile. If your old profile is corrupted in some way, you can move the files and settings from the corrupt profile to a new profile.
Saturday, April 2, 2011
System Restore settings Windows XP

one or more drive letters may be missing in the list of Available Drives in system restore. As a result, monitoring may not be enabled for the missing drives.
Your response Issue: When you open System Restore settings, one or more drive letters may be missing in the list of Available drives. As a result, monitoring may not be enabled for the missing drives.
Your response Issue: When you open System Restore settings, one or more drive letters may be missing in the list of Available drives. As a result, monitoring may not be enabled for the missing drives.
Wednesday, January 5, 2011
Change File Association In Windows XP
When you double-click a file to open it, Windows XP examines the file name extension. If Windows XP recognizes the file name extension, it opens the file in the program that is associated with that file name extension.
However, you can change the program that is associated with recognized file name extensions so that Windows XP opens all files that have this extension in the new associated program.
To display file name extensions
Depending on your settings, the file name extensions of your files may not be visible. To display the file name extensions of your files if they are not visible, follow these steps:
1. Open My Computer or Windows Explorer.
2. On the Tools menu--> click Folder Options.
3. Click the View tab.
4. In the Advanced settings box--> click to clear the Hide extensions for known file types check box.
5. Click OK.
Important:
1. You cannot use this method for a file that does not have a file name extension, or for a file that has an (.exe, .com, or .bat extension).
2. If you change the program that Windows uses to open a certain kind of file, and that program was not designed for the type of data in that file, the files may not appear correctly in the program. To be safe, note the name of the program that Windows previously used to open the file type so that you can reverse your settings if it is necessary.
However, you can change the program that is associated with recognized file name extensions so that Windows XP opens all files that have this extension in the new associated program.
To display file name extensions
Depending on your settings, the file name extensions of your files may not be visible. To display the file name extensions of your files if they are not visible, follow these steps:
1. Open My Computer or Windows Explorer.
2. On the Tools menu--> click Folder Options.
3. Click the View tab.
4. In the Advanced settings box--> click to clear the Hide extensions for known file types check box.
5. Click OK.
Important:
1. You cannot use this method for a file that does not have a file name extension, or for a file that has an (.exe, .com, or .bat extension).
2. If you change the program that Windows uses to open a certain kind of file, and that program was not designed for the type of data in that file, the files may not appear correctly in the program. To be safe, note the name of the program that Windows previously used to open the file type so that you can reverse your settings if it is necessary.
Monday, November 29, 2010
How To Use System File Checker Tool In Windows XP
Windows XP has the ability to protect itself from system instability caused by 3rd party software overwriting important system files.
In Windows XP we have more refined protection of these important files.
Windows File Protection
By default, Windows File Protection is always enabled and allows Windows digitally signed files to replace existing files safely. Currently, signed files are distributed through:
1. Windows Service Packs
2. Hotfix distributions
3. Operating system upgrades
4. Windows Update
5. Windows Device Manager
The main reason for using this utility is when you suspect there may be a problem with a Windows XP system file.
Perhaps you get a dialog box appear informing you of a problem with a .dll file, or your program will just not load! It is therefore worth checking to see if there are any corrupt system files using sfc scannow.
To do this simply go to the Run box on the Start Menu and type in:
sfc /scannow
This command will immediately initiate the Windows File Protection service to scan all protected files and verify their integrity, replacing any files which has a problem.
The following should appear to give an indication of how long the process is taking.


When does this happen?
In Windows XP we have more refined protection of these important files.
Windows File Protection
By default, Windows File Protection is always enabled and allows Windows digitally signed files to replace existing files safely. Currently, signed files are distributed through:
1. Windows Service Packs
2. Hotfix distributions
3. Operating system upgrades
4. Windows Update
5. Windows Device Manager
The main reason for using this utility is when you suspect there may be a problem with a Windows XP system file.
Perhaps you get a dialog box appear informing you of a problem with a .dll file, or your program will just not load! It is therefore worth checking to see if there are any corrupt system files using sfc scannow.
To do this simply go to the Run box on the Start Menu and type in:
sfc /scannow
This command will immediately initiate the Windows File Protection service to scan all protected files and verify their integrity, replacing any files which has a problem.
The following should appear to give an indication of how long the process is taking.

Any corrupt, missing or incorrect files would be replaced by this process. The most common issue with scannow sfc is the following dialog box appearing:

In the computer's operating system registry, are several settings that are checked when you run scannow sfc.
The Windows File Protection service constantly monitors for any changes to the main system files.
Well Windows XP keeps a cache (copy) of these essential files at the following location:
C:WINDOWS\System32\Dllcache (assuming C: is your system root)
The dllcache folder is extremely important so Windows XP hides it from you! To view it go to:
My Computer--> Tools--> Folder Options--> View--> "uncheck" Hide protected operating system files.
If that's the case on your computer then there is normally no need for the original XP CD to be inserted as your computer has a "copy" it can get hold of in this cache.
But, if the Dllcache folder, or part of it, has become corrupted for some reason then you will be prompted for the XP CD - so your computer can get a clean copy.
Wednesday, December 29, 2010
Send A Fax In Windows XP

To start the Send Fax Wizard, use one of the following methods:
In the Fax console:
1. Click Start--> point to All Programs--> point to Accessories--> point to Communications--> point to Fax--> and then click Fax Console.
2. In the Fax console, click New Fax or click Send a Fax on the File menu.
In the Print dialog box:
1. Start the program that you want. For example--> start Microsoft Word.
2. On the File menu--> click Print.
3. In the Print dialog box--> click Fax in the Name box--> and then click OK.
In Control Panel:
1. Click Start--> and then click Control Panel.
2. In Control Panel--> click Printers and Other Hardware in the Pick a category box.
3. In the or pick a Control Panel icon box--> click Printers and Faxes.
4. In the Printer Tasks box--> click Send a fax.
How to Create and Send the Fax:
1. In the Welcome to the Send Fax Wizard dialog box--> click Next.
2. In the Recipient Information dialog box--> type the recipient name in the To box--> type the recipient fax number in the Fax number box--> or use the Address Book to click the recipient name--> and then click Next.
NOTE: If you want to send the fax to more than one recipient, type the recipient information in the appropriate boxes, and then click Add. The recipient appears in the box and the boxes are cleared so that you can type additional recipient information.
When you finish adding recipients--> click Next.
3. In the Preparing the Cover Page dialog box--> click the template that you want to use in the Cover page template box.
4. If you want to edit the information that appears on the cover page--> click Sender Information.
5. Type the subject that you want to appear on the cover page of the fax in the Subject line box--> and then type a cover page note in the Note box if you want to include a note.
6. Click Next.
7. In the Schedule dialog box--> click the time that you want to send the fax--> for example--> click Now.
8. In the What is the fax priority box--> click the priority that you want (a higher priority allows this fax item to be sent before another similarly scheduled and lower priority item)--> and then click Next.
9. In the Completing the Send Fax Wizard dialog box--> confirm the options that you selected--> and then click Finish.
How to View the Status of the Fax:
You can view the status of the fax in the Fax console. To do this:
1. Click Start--> point to All Programs--> point to Accessories--> point to Communications--> point to Fax--> and then click Fax Console.
2. In the left pane--> click to expand Fax (if it is not already expanded). The following list describes the folders under Fax:
. The Incoming folder contains faxes that are currently being received.
. The Inbox folder contains faxes that have been received.
. The Outbox folder contains faxes that are scheduled to be sent.
. The Sent Items folder contains faxes that have been successfully sent.
3. In the left pane--> click the folder that you want.
4. In the right pane--> right-click the fax that you want--> and then click Properties.
5. On the General tab--> view the Status line. When you are finished--> click Close.
Tuesday, June 7, 2011
Things in my folders are too big or small

Windows XP supports a number of different folder features. For example, you can see the icons in a simple list, by small icons, by thumbnails, and a number of other options. If the icons are too big, you have to scroll all over the place to see what is in the folder if things are too small, you may have difficulty seeing them. No problem, You can easily change how things look in your folders.
On the folder that you want to change, just click the--> View menu on the top toolbar. You see a section containing different file view options, choose the option you want by clicking it. You can return to this menu at any time and try a different setting.

Friday, January 7, 2011
Remove Windows Recovery Console In Windows XP
After installing Windows Recovery Console there may be time that you may need to remove Recovery Console due to an Operating system upgrade, disk maintance etc.
Please follow these steps below to accomplish this task:
1. Log on as local administrator.
2. Double click on "My Computer" icon on the desktop.
3. In "My Computer" open: Tools--> Folder Options--> View--> Mark the checkbox
"Show hidden files and folders" and clear the "Hide protected operating system files" checkbox (please press on "Yes" to the confirm message).
4. Double click on the %systemdrive% (usually "C" drive) and delete "cmdcons" folder and the cmldr file from the root drive.
5. Right-click boot.ini on the system partition and select Properties, then clear the "Read-only" checkbox.
6. Double click on the "boot.ini" file (The file resides in the root of the %systemdrive%).
7. Remove the line C:\CMDCONS\BOOTSECT.DAT="Microsoft Windows Recovery Console" /cmdcons
8. Save the boot.ini file and close the text editor.
Please follow these steps below to accomplish this task:
1. Log on as local administrator.
2. Double click on "My Computer" icon on the desktop.
3. In "My Computer" open: Tools--> Folder Options--> View--> Mark the checkbox
"Show hidden files and folders" and clear the "Hide protected operating system files" checkbox (please press on "Yes" to the confirm message).
4. Double click on the %systemdrive% (usually "C" drive) and delete "cmdcons" folder and the cmldr file from the root drive.
5. Right-click boot.ini on the system partition and select Properties, then clear the "Read-only" checkbox.
6. Double click on the "boot.ini" file (The file resides in the root of the %systemdrive%).
7. Remove the line C:\CMDCONS\BOOTSECT.DAT="Microsoft Windows Recovery Console" /cmdcons
8. Save the boot.ini file and close the text editor.
Saturday, January 8, 2011
Setting Up and Configuring Alerts In Messenger

How To SetUp and Configure Alerts
1. Go to the following Microsoft Web site: http://alerts.microsoft.com/
A "Welcome to Microsoft .NET Alerts" Web page opens.
2. Sign in by using your Passport.
3. Click Sign up for Microsoft .NET Alerts.
4. On the General Settings Page, specify where you want your .NET Alerts to be delivered. You can specify any of the following locations:
Your computer, using Windows Messenger
Your mobile device
Your e-mail inbox
5. Click Choose .NET Alerts providers.
6. Click a name or logo to set up or to change alerts from that provider. Providers to choose from are:
MSN Money
MSN Calendar
MSN Carpoint
MSN Music
eBay
FYE
uBid Online Auctions
McAfee.com
7. Go to the provider that you choose, and follow the instructions for setting up or changing .NET Alerts for that provider.
Tuesday, June 7, 2011
Know the Size, Type of a File in a Folder

Windows XP gives you a number of options that can be displayed with a file.
For example, let’s say you are looking at a bunch of files in a folder. With the right configuration, you can see not only the names of the files, but also their size, type, who created them, and other details. You can easily determine what details you want to display for files in a folder.
To make changes to the details settings of files
For example, let’s say you are looking at a bunch of files in a folder. With the right configuration, you can see not only the names of the files, but also their size, type, who created them, and other details. You can easily determine what details you want to display for files in a folder.
To make changes to the details settings of files
- open the folder and click the View menu.
- Click--> the Choose Details option--> a Choose Details window appears
- Click the details you want presented with the file--> click OK.
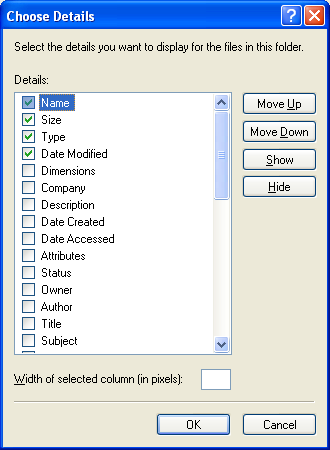
You can come back to this window and change the detail items you want to see at any time.
Wednesday, June 8, 2011
I can’t get Offline Files to work
Offline Files has to be turned on and configured before you can use it on your computer.
To turn on and configure Offline Files, follow these steps:
To turn on and configure Offline Files, follow these steps:

1. To set up Offline Files--> open Folder Options in Control Panel--> click the Offline Files tab.

2. On the Offline Files tab--> click the Enable Offline Files check box--> You can then make some additional configurations as desired.
For example: you can choose to have Windows synchronize offline files when you log on/log off, and even the amount of disk space that offline files can use.
3. When you are done--> click OK.
4. You can now access the desired network resource, right-click it, and click Make Available Offline.
Prevention:
Offline Files is not compatible with Fast User Switching. In order to set up
Offline Files, you must first disable Fast User Switching with the Users icon in Control Panel.
For example: you can choose to have Windows synchronize offline files when you log on/log off, and even the amount of disk space that offline files can use.
3. When you are done--> click OK.
4. You can now access the desired network resource, right-click it, and click Make Available Offline.
Prevention:
Offline Files is not compatible with Fast User Switching. In order to set up
Offline Files, you must first disable Fast User Switching with the Users icon in Control Panel.
Subscribe to:
Posts (Atom)